
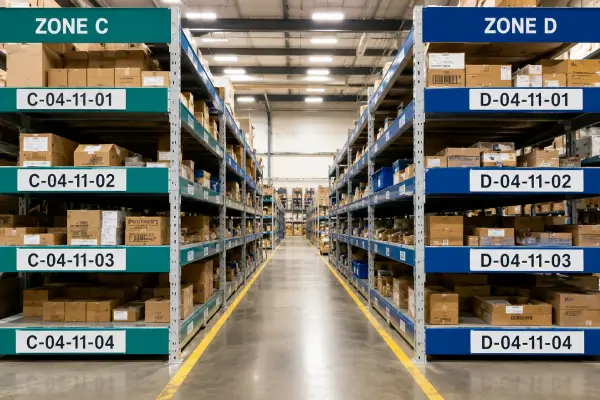


When a picker grabs the wrong item, most people blame the picker. In a 3PL warehouse, the real problem is almost always the bin setup.
According to ASCM (Association for Supply Chain Management), best-in-class warehouse operations target order accuracy at 99.5 to 99.9%. Most 3PLs that fall below this share one thing in common: their bin locations were never set up correctly in the WMS.
Most guides you find online were written for a simple, single-client warehouse. A 3PL is completely different. You might have 10, 20, or 50 clients sharing the same rack. This guide is written specifically for 3PL operators, covering every step from your first zone map to go-live day.
What Is a Bin Location in a 3PL WMS?
A bin location is the smallest storage unit your WMS knows about. Think of it as an address. Your WMS uses this address to tell a picker exactly where to go to find a product.
In a 3PL warehouse, bins work in two ways:
- Client-dedicated bins: Reserved for one client only. No other client’s products ever go in there.
- Shared bins: Used by different clients at different times. The WMS tracks which client owns the inventory currently sitting in each bin.
Your WMS needs to handle both types cleanly. If it cannot, you will end up manually sorting mixed inventory and having difficult conversations with unhappy clients.
Step 1: Draw Your Zone Map Before You Touch the WMS
This is the step most people skip. They jump straight into the WMS and start creating bin records, then realise the layout makes no sense and have to start over.
Your WMS bin structure is a digital copy of your physical warehouse. Start by dividing your warehouse into zones on paper first:
| Zone | What It Is For |
| Zone A | Receiving and inbound staging |
| Zone B | Bulk pallet storage |
| Zone C | Active pick shelving (fast-moving products) |
| Zone D | Reserve and overflow storage |
| Zone E | Returns processing |
| Zone F | Special storage: hazmat or temperature-controlled |
Once you have your zones, decide which ones will be dedicated to specific clients and which will be shared.
Guideline: Give a client their own dedicated zone if they have more than 400 to 500 active SKUs, or if their products need special handling such as fragile items, age-restricted goods, or refrigeration. Some 3PLs set this threshold at 200 SKUs. Others go by cubic footage. Have a clear rule before inventory arrives.
For smaller clients, shared zones work well. The WMS keeps track of which client owns what, so products stay separated in the system even when the physical racking is shared.
Step 2: Build Your Bin Naming Convention
In a 3PL, your naming convention does more than describe where a bin is. It also controls how efficiently your WMS routes pickers through the warehouse.
Use this structure: Zone + Aisle + Bay + Level + Position
Example: C-04-11-03-R means: Zone C (active pick), Aisle 4, Bay 11, Level 3, Right side.
For client-dedicated zones, add the client code at the front:
Example: BRD-A-02-07-01 means: Client BRD, Zone A, Aisle 2, Bay 7, Level 1.
For shared zones, do not put client codes in the bin name. Use client tagging at the inventory record level in your WMS instead. If you put client codes into shared bin names, you will have to rename bins every time a client leaves or changes space.
Your WMS sequences pick tasks in bin location order. Inconsistent naming means pickers zigzag across the warehouse instead of walking a clean route. Research from a peer-reviewed warehouse operations study found that warehouses without standardised location systems produce significant wasted movement in order picking, with travel time as the primary source of inefficiency. A consistent bin naming convention is the foundation that eliminates this problem.
Step 3: Configure Bin Locations in Your WMS
Do this in order or you will have to redo work:
- Create your zones. Enter each zone as a parent record and set its type.
- Create aisles within each zone. Set the aisle direction so the WMS can build efficient pick routes.
- Create the individual bin records. For each bin, enter the bin code, zone, bin type, capacity, weight limit, and any product restrictions.
Three fields most operators skip:
- Bin capacity limits. Without these, the WMS keeps sending putaway tasks to full bins. Products get stacked wherever they fit, and inventory gets mixed.
- Bin type. Pick bin, reserve bin, or bulk bin. This tells the WMS whether to pick directly from here or treat it as a reserve that needs replenishing first.
- Allowed product flags. Restrict hazmat bins from non-hazmat products. The system catches the error, not the picker.
For warehouses with 500 or more bins, build your full bin list in a spreadsheet and import it via CSV in one batch. A 1,000-bin warehouse configured this way takes a few hours, not several days.
Step 4: Print and Apply Your Bin Labels
Every bin label needs three things:
- A human-readable location code. Print it large enough to read from 3 metres away while walking.
- A scannable barcode. Use Code 128 format. This is the standard used in warehouse operations worldwide and works with virtually every WMS scanner on the market.
- A zone colour band. A coloured stripe at the top of the label so pickers can spot the zone before they can read the code.
For client-dedicated zones, add the client name to the label. This stops a picker from accidentally placing products in the wrong client’s area, even when moving quickly.
| Critical rule: Always finalise and validate your WMS bin records before printing labels. If a bin code changes after labelling, you are reprinting hundreds of labels. Configure first, then print. |
5 Bin Setup Mistakes That Cause Mispicks
- Using different naming formats across zones. If Zone B and Zone C use different structures, the WMS cannot build a clean pick sequence. Agree on one format for your whole facility before creating a single record.
- Not setting bin capacity limits. The WMS overfills bins, and products end up mixed. This is one of the most common causes of inventory discrepancy complaints in 3PL client accounts.
- Shared bins without client tagging. Telling pickers to remember which products belong to which client is not a process. Every shared bin needs client ownership enforced at the inventory record level in the WMS.
- Skipping the bin walkthrough before go-live. Phantom bin records are bins in the WMS that do not exist on the floor, or bins on the floor never been entered into the WMS. Walk every aisle and check every bin against the WMS list before you receive a single shipment.
Not training pickers on the naming convention. Before go-live, walk your picking team through the warehouse and have them read bin codes out loud. If they hesitate or misread, simplify the convention before errors happen at volume.
How to Keep Your Bin Structure Working as You Grow
Adding zones for new clients. When a client outgrows the shared zone, give them a dedicated zone before problems start. Plan for a 2 to 3 week lead time to configure, label, and validate before their inventory arrives.
Changing bin codes without losing history. Never delete old bin records from a WMS with transaction history. Create new records, move inventory to the new locations, and set old records to inactive. This keeps all pick history and client billing data intact.
Run a velocity report in your WMS every quarter and move your top 20% of SKUs by order frequency into the best pick positions. In most warehouses, around 20% of SKUs drive 80% of all picks. Keeping those SKUs in your closest, most accessible bins is the single highest-impact slotting habit a 3PL can build.
The Right WMS Makes This Easier
Bin location setup is not complicated. But it requires a system that enforces your rules automatically, so you do not rely on staff memory to keep things clean.
WizeFulfill 3PL warehouse management system lets 3PL operators build their full bin structure before a single item arrives. Configure zones, set client rules, import bin records from a spreadsheet, and enforce capacity limits automatically. Every putaway, every pick, and every cycle count runs against a validated structure from day one.
Frequently Asked Questions
-
Can two clients share the same bin in a 3PL warehouse?
Technically, yes, but it is strongly discouraged. When two clients share a single bin, even temporarily, the risk of mixed inventory and mispicks increases significantly. The safer approach is to allow one client per bin at any given time, with the WMS enforcing this rule at the inventory record level. If space is limited, shared zones work well as long as bin-level client ownership is tracked in the system, not managed by memory on the warehouse floor.
-
How many bin locations does a 3PL warehouse typically need?
There is no fixed number, but a useful starting rule is one bin location per 1 to 2 active SKUs for your pick zone, plus additional reserve bins for bulk storage. A 3PL managing 5,000 active SKUs across 20 clients might operate between 3,000 and 6,000 bin locations depending on product size, velocity, and storage type. The more important number is utilization rate. Most warehouse operations experts recommend keeping active pick bin utilisation between 75 and 85 percent. Below that, you are wasting space. Above it, you lose flexibility to handle new client onboarding or seasonal volume spikes.
-
What happens to bin location data when a 3PL loses a client?
When a client leaves, their bin records should be set to inactive in the WMS, not deleted. Deleting bin records removes the transaction history attached to them, which you may need for billing disputes, inventory reconciliation, or compliance audits. The physical bins can be reassigned to a new client immediately. In the WMS, create new inventory records pointing to those same bin locations under the new client account. The bin code stays the same. Only the ownership changes.